Zoom FAQ
Steps to begin using Zoom like a pro
- Submit a request for an ATSU Zoom license through the ITS Service Desk.
- Add the Zoom plug-in to your course site in Canvas.
- Launch meetings easier by added the Zoom extension to your Chrome browser.
- Learn how to automatically transcribe cloud recordings.
- How to set up your own green screen and virtual background video tutorial
- Zoom experts host free and interactive live training webinars daily. Get up to speed in less than an hour.
- Tips and Tricks for Educators Using Zoom
Basic Tutorial for how to teach online using Zoom:
- Audio Help
- Video Help
- How Do I Host A Video Meeting?
- Joining a Meeting
- How do I Start or Join a Scheduled Meeting as the Host?
- How do I invite others to join a meeting?
- Can I Host Concurrent Meetings?
- Join Multiple Meetings Simultaneously on Desktop
- Participating in Breakout Rooms
- Joining a test meeting
- Show a "Join from your browser" Link
Starting a cloud recording
Note: Only hosts and co-hosts can start a cloud recording. If you want a participant to start a recording, you can make them a co-host or use local recording. Recordings started by co-hosts will still appear in the host's recordings in the Zoom web portal.
To record a meeting to the cloud:
- Start a meeting as the host.
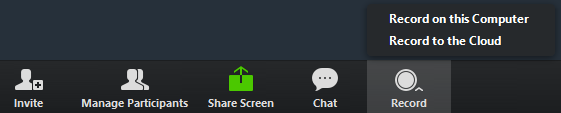
- Click the Record button in the Zoom toolbar.
- Select Record to the Cloud to begin recording.
- To stop recording, click Pause/Stop Recording or End Meeting.

Once the recording has been stopped, the recording must be processed before viewing. Zoom will send an email to the host's email address when the process is completed. - Manage your cloud recordings:
- Finding and Viewing Recordings
- Automatic Recording
- Frequently asked questions about local and cloud recording
- Recording without the Host
- Managing cloud recordings
- Automatically Transcribe Cloud Recordings
- Recording Good Quality Audio to Ensure Accurate Transcripts
- Recording Notifications
- Cloud Recording Playback
- Recover a Deleted Cloud Recording
Sharing your screen
- Click the Share Screen button located in your meeting controls.

- Select the screen you want to share. You can also choose an individual application that is already open on your computer, the desktop, a whiteboard, or an iPhone/iPad.
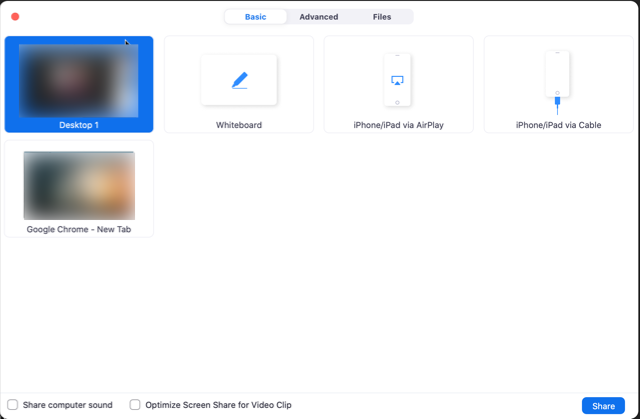
- (Optional) Enable these features:
- Check Share Computer Sound: If you check this option, any sound played by your computer will be shared in the meeting.
- Check Optimize for full screen video clip: Check this if you will be sharing a video clip in full screen mode. Do not check this otherwise, as it may cause the shared screen to be blurry.
- Click Share.
- Zoom will automatically switch to full screen to optimize the shared screen view. To exit full-screen, click Exit Full Screen in the top-right corner or press the Esc key.
- To disable automatic full screen when viewing a shared screen, disable this option in your desktop client settings: Enter full screen automatically when a participant shares screen.
- ★ Sharing your screen
- Video Layout Options While Screen Sharing
- How Do I Start A Screen Share Meeting?
- Switching Windows During Screen Sharing
- Sharing Computer Sound During Screen Sharing
- Screen Sharing a PowerPoint Presentation
- Screen Share A Keynote Presentation
- Request or Give Remote Control
- Sharing a whiteboard
- Side-by-Side Mode for Screen Sharing
- Sharing Multiple Screens Simultaneously
- Using annotation tools on a shared screen or whiteboard
- Follow Presenter’s Pointer During Screen Sharing
- Black Screen During Screen Sharing
Overview
Breakout rooms allow you to split your Zoom meeting in up to 50 separate sessions. The meeting host can choose to split the participants of the meeting into these separate sessions automatically or manually, and can switch between sessions at any time.
- Up to 50 breakout rooms can be created
- Max 200 total participants across all breakout rooms (requires Large Meeting 200 add-on)
- Breakout room participants have full audio, video and screen share capabilities
You can also share Participating in Breakout Rooms with your meeting participants for some information on using breakout rooms as a participant.
Notes:
- See Getting Started with Breakout Rooms for information on how to enable breakout rooms for your account.
- You can also pre-assign participants to breakout rooms when you schedule the meeting instead of managing them during the meeting.
This article covers:
- Creating Breakout Rooms
- Assigning Participants to Rooms
- Preparing Breakout Rooms
- Managing Breakout Rooms - In Progress
- Ask for Help
- Broadcasting a Message to Breakout Rooms
Prerequisites
- Breakout rooms enabled in your Meeting Settings
- Zoom Desktop Client
- Windows: 3.5.31087.1102 or higher
- macOS: 3.5.31087.1102 or higher
- Linux: 2.0.81497.1116 or higher
- Chrome: 2.4.943.510 or higher
Note: Users joined into the Zoom meeting from the Zoom Mobile App or H.323/SIP devices can participate in breakout rooms, but cannot manage them. Users joined via the web client, Chromebooks/Chrome OS or Zoom Rooms are unable to join Breakout Rooms, but the main room can be used as an alternative session for these users.
 Windows |
  Mac
MacCreating Breakout Rooms
Note: You can also pre-assign participants to breakout rooms when you schedule the meeting instead of managing them during the meeting.
- Start an instant or scheduled meeting.
- Click Breakout Rooms.

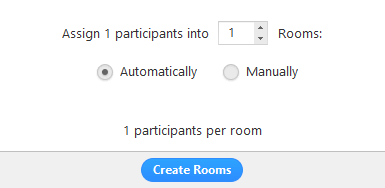
- Select the number of rooms you would like to create, and how you would like to assign your participants to those rooms:
- Automatically: Let Zoom split your participants up evenly into each of the rooms.
- Manually: Choose which participants you would like in each room.
- Click Create Breakout Rooms.
- Your rooms will be created, but will not start automatically. You can manage the rooms prior to starting them by following the instructions below.
Options for Breakout Rooms
- After creating the breakout rooms, click Options to view additional Breakout Rooms options.

- Check any options that you would like to use for your breakout rooms.
- Move all participants into breakout rooms automatically: Checking this option will move all participants into the breakout rooms automatically. If this option is unchecked, the participants will need to click Join to be added to the breakout room.
- Allow participants to return to the main session at any time: If this option is checked, the participants can move back to the main session from their meeting controls. If this is disabled, they need to wait for the host to end the breakout rooms.
- Breakout rooms close automatically after x minutes: If this option is checked, the breakout rooms will automatically end after the configured time.
- Notify me when the time is up: If this option is checked, the host will be notified when the breakout room time is up.
- Countdown after closing breakout rooms: If this option is checked, the participants will be given a countdown of how much time they have left before being returned to the main room.
- Follow the steps below to assign participants to rooms or click Open All Rooms to start the breakout rooms.
Assigning participants to rooms
To assign participants to your rooms, select Assign next to the room you wish to assign participants to and select participants you want to assign to that room. Repeat this for each room.

Once a participant has been assigned (manually or automatically), the number of participants will show in place of the Assign button.

Preparing Breakout Rooms
After manually or automatically assigning participants to rooms, you can rearrange the participants. Participants who are not assigned to breakout sessions will remain in the main meeting when the rooms are started.
- Move to (participant): Select a room to move the participant to.
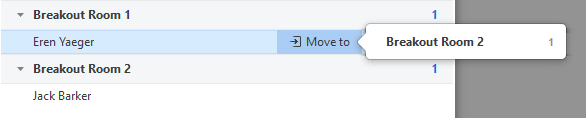
- Exchange (participant): Select a participant in another room to swap the selected participant with.

- Delete Room: Delete the selected room.
- Recreate: Deletes existing breakout rooms and creates new ones.
- Add a Room: Add another breakout room.
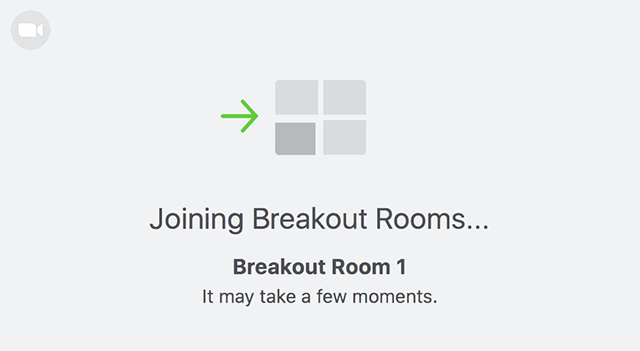
- Open All Rooms: Start the rooms. All participants will be moved to their respective rooms after confirming the prompt to join the breakout room. The host will be left in the main meeting until manually joining one of the rooms. The participants (and the host when manually joining a room) will see the following message shown when joining the breakout room.
Managing Breakout Rooms in progress
Once the Breakout Rooms have been started, the participants will be asked to join the Breakout Session. The host will stay in the main meeting until joining a session manually. If a participant has not joined the session yet, it will be noted by (not joined) next to their name.
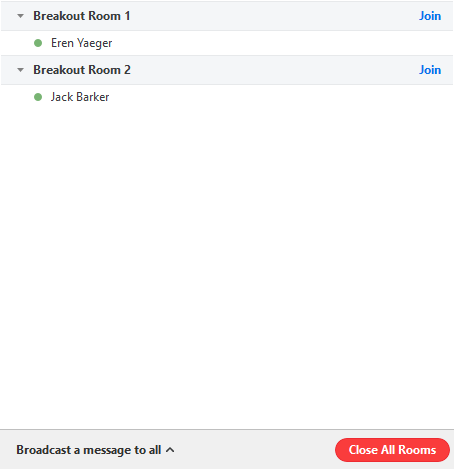
- Join: Join the breakout room.
- Leave: Leave the room and return to the main meeting (only shows when in a breakout room).
- Close All Rooms: Stops all rooms after a 60 second countdown, shown to the host and participants, and returns all participants back to the main meeting.
Ask for help
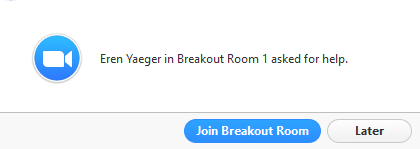
Participants in breakout rooms can request that the meeting host join their meeting by clicking Ask for Help.

The host will be prompted to join the room where the request originated from. Click Join Breakout Room to join the room.
Broadcasting a message to all Breakout Rooms
The host can broadcast a message to all breakout rooms to share information with all participants.
- Click Breakout Rooms in the meeting controls.
- Click Broadcast a message to all, enter your message and click Broadcast.
- The message will now appear for all participants in Breakout Rooms.

From the Zoom Support Page
Creating a Poll
- Go to the Meetings page and click on your scheduled meeting. If you do not have a scheduled meeting, schedule a meeting now.
- From the meeting management page, scroll to the bottom to find the Poll option. Click Add to begin creating the poll.

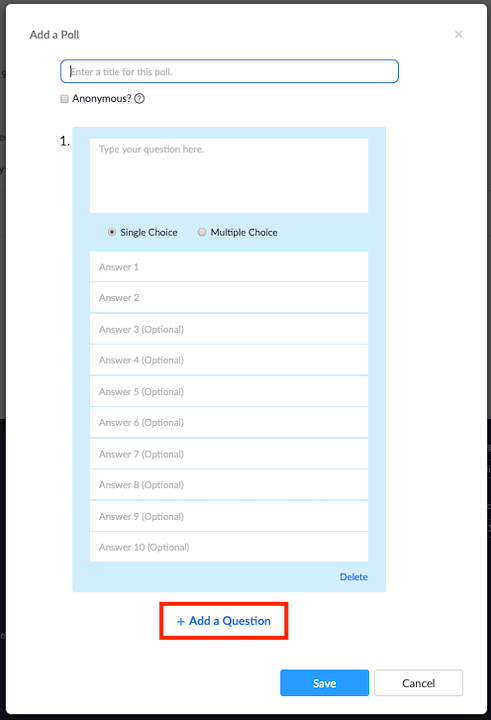
- Enter a title and your first question.
- (Optional) Check the box to make the poll anonymous, which will keep the participant's polling information anonymous in the meeting and in the reports.
- Select whether you want the question to be single choice(participants can only choose one answer) or multiple choice question(participants can choose multiple answers).
- Type in the answers to your question and click Save at the bottom.
- If you would like to add a new question, click Add a Question to create a new question for that particular poll.
- You can add more polls by repeating Step 2.
You can also create a poll by clicking Polling during the meeting. This will open up your default web browser where you can add additional polls or questions.
Note: You can only create a max of 25 polls for a single meeting.
Launching a Poll
- Start the scheduled Zoom meeting that has polling enabled.
- Select the Polling option in the menu bar.

- Select the poll you would like to launch.
- Click Launch Poll.

- The participants in the meeting will now be prompted to answer the polling questions. The host will be able to see the results live.

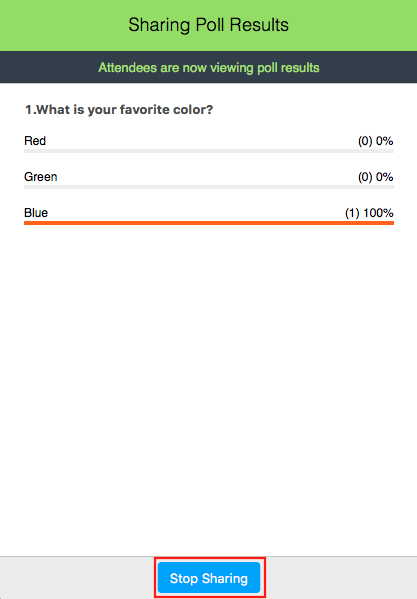
- Once you would like to stop the poll, click End Poll.
- If you would like to share the results to the participants in the meeting, click Share Results.

Participants will then see the results of the polling questions.
Downloading a Report of Poll Results
You can download a report of the poll results after the meeting. If registration was turned on and the poll was not anonymous, it will list the participants' names and email addresses. If registration was not on, it will show the results, but list the users as "Guest". If the poll was anonymous, it will show "anonymous" for the participants' names and email addresses. Learn more.
From the Zoom Support Page
ATSU Zoom Tutorials

Overview and Q/A of Zoom Drop-In Session Recording. (Click to watch) Recorded Wednesday, March 18.
Ryan Hutman, from Academic Technology, introduces (51:44 min) Zoom for video conferencing. This video reviews the tool's features as well as how to run a virtual meeting. If you do not have access to Zoom, please submit an ITS Service Desk ticket.
Zoom Beginner Breakout Sessions
Setting yourself up for success using Zoom to teach Online
Presenter: David Lopez and Barbara Maxwell
This session covers how to set up your account, important zoom settings, and how the active speaker or gallery screen works.
How to use Zoom during Class
Presenter: Brittany Williams
This session covers how to use the features in Zoom while presenting. It touches on the share screen abilities, as well as walks through the chat and participant panels. This session also looks at interactive features like the Zoom poll and Zoom breakout rooms.
Zoom for Beginners
Presenters: David Lopez and Dean Maag
This session discusses the basics for how to facilitate your class online using zoom.
What to do in Zoom after class (Meeting Recording)
Presenter: Kirsty Gaither
This session looks at what to do after your meeting has ended, and discusses ways to set your meeting up ahead of time to make it easier to move your zoom recording into Canvas or Echo 360.
Zoom Usage Guidelines
- Live PowerPoint presentation: The presenter prepares a PowerPoint presentation on the selected topic and shares while narrating, with 5-10 minutes set aside for Q&A or discussion for each hour. Three to five quiz questions related to the topic are encouraged. Students can be divided into teams and answer questions in the chat or groups can be called on to reply.
Pro Teaching Tip: Pause every ~10 minutes to ask questions then call on a group to give a response. Limit presentation to max of 45 slides for a 1-hour presentation (general rule is 1 minute per slide) to allow time for discussion/ Q&A.
- Live case presentations: The presenter prepares 3-5 short clinical cases related to the selected topic, with 3-5 questions for each case. Using a PowerPoint or word document, the presenter discusses the cases and takes turns asking each group to answer questions, promoting discussion on diagnosis, treatment and evidence-based practice.
Pro Teaching Tip: Provide brief overview of topic prior to case discussion, share clinical pearls, best practices.
- Combination presentation: The presenter uses a combination of methods to present the assigned topic. This could include a brief PowerPoint presentation with an overview of the topic, then facilitating interaction via questions in a game format, images quiz, sharing/discussing cases, etc. Or a short presentation followed by a group activity in breakout rooms, then reconvening and calling on groups to report their findings/answers questions.
Pro Teaching Tip: Prepare key teaching points; include clinical pearls when relevant. Call on groups by name to answer questions, waiting at least 5 seconds for them to respond.
- Ensure you have a PC or Mac with a camera for Zoom presentations
- To activate Zoom for the first time, you will need to do a quick download.
- Open your computer browser and go to: Download Center
- If you receive an email invite, you simply click on the link to join the meeting. If you go to the Download Center you can join the meeting by entering the 9, 10, or 11 digit code from your invite.
- The name that you enter into the ‘Your name’ field is the name that will represent you in the meeting.
- After joining, the audio conference box should appear, click on test mic & speaker to ensure that the correct audio devices are selected. Next, click on “Join audio conference by computer” to enter the meeting.
- General: You can select default preferences
- Audio: You can test, select and adjust your speakers, and microphone
- Video: You can test and select your video camera
Meeting Features
- Once you have started or joined a meeting, you can perform the following actions from the menu bar located at the bottom of the meeting window (move your mouse to toggle) you can:
- Mute or unmute using the microphone icon
- Invite more people to join by email, IM, SMS (mobile users) or meeting ID
- Screen share your desktop or specific application window including a PowerPoint file using the share screen function, see next section.
- Chat with all participants or privately.
- Leave meeting

- To start "Screen Sharing" select "Share Screen" button located in your meeting toolbar.
- After selecting "Share Screen" you can choose to share your "Desktop" or an "individual application/window".
- You need to select share "computer audio" when sharing a video clip such as YouTube or a locally stored video clip.
- Pause: Pause your current screen share
- Share a New Window: Select a new window to share (Choose another window/application to share)
- Remote Control: allow a participant to control your keyboard and mouse
- Mute: toggle mute/unmute for your microphone
- Stop Video: Stop/Start your in-meeting video feed
- More: In-meeting Toolbar options (in-meeting options such as - Participants, Chat, Invite, etc..)
- Annotate: Use screen share tools for drawing, pointer, etc ..(see more info below)
- During your Screen share you will have the option of using several features. By moving your mouse cursor to the top of the screen to open the drop-down menu and select "Annotate".
- If you are using a dual monitor set-up. You can turn on the "dual screen for dual monitor feature" to see the screen sharing on one monitor and participants on the second.
- Any Attendee in your meeting can start annotating on a shared screen. The Attendee can access "Annotate" in the upper meeting tool-bar.
- If the Host of the meeting "Locks Annotation," Attendees will not be able to use the feature
- Stop share: when you are finished with your presentation, click on stop share to return to full screen
- At the end of your presentation, be sure to click on Stop Share in the screen share menu and you will return to full screen!
- Up to 50 breakout rooms can be created
- Max 200 total participants across all breakout rooms (requires Large Meeting 200 add-on)
- Breakout room participants have full audio, video and screen share capabilities
How to record a lecture using Zoom
- Sign in to the Zoom web portal and click My Meeting Settings (if you are an account administrator) or Meeting Settings (if you are an account member).
- In the Recording tab, navigate to the Local Recording option and verify that the setting is enabled.
- If the setting is disabled, click the toggle to enable it. If a verification dialog displays, choose Turn On to verify the change.
- Note: If the option is grayed out, it has been locked at either the group or account level, and you will need to contact your Zoom administrator.
Starting a Local Recording
The host must record the meeting or grant the ability to record to a participant.
- Start a Zoom meeting as the host.
- Click the option to Record and select Record on this Computer.


- Hosts will see the following recording indicator in the top-left corner while recording is active.

- Participants will see the following indicator in the top-left corner while the recording is active.

- Click Manage Participants to see which users are currently recording.
- Note: Dial-in participants will hear a message informing them that the meeting is now being recorded unless disabled by the host.
- After the meeting has ended, Zoom will convert the recording so you can access the files.
- Once the conversion process is complete, the folder containing the recording files will open.
- Note: By default, the audio/video file (MP4) will be named Zoom_0.mp4. The audio only file (M4A) is named audio_only.m4a.
Note:
- If the meeting unexpectedly shuts down or if the conversion process is interrupted, the recording files could become corrupted and non-recoverable. Restarting or shutting down your computer, putting the hard disk to sleep, or closing your laptop will interrupt the conversion process.
- If the conversion process is not successful after the meeting has ended, you can try to convert the files again by navigating to the recording location and double clicking the recording files.
- You can record the meeting in different layouts including active speaker, gallery view, and shared screen. Learn more about recording layouts.
Stopping or Pausing a Local Recording
During a Zoom recording, a user can Stop or Pause the recording. If a user stops the recording and starts it again, a new video file will be created for the next recording segment. If a user pauses the recording and starts it again, Zoom will record to the same video file for the recording segment.
- After a recording has been started, click Pause or Stop Recording at the bottom.

The recording can also be stopped or paused by clicking the indicator in the top left corner. - When a recording is paused, the following indicator will be displayed in the meeting.

- To resume the recording, click Resume Recording at the bottom

- The recording can also be resumed by clicking the indicator in the top left corner.


Assigning Recording Privileges to a Participant
- In a Zoom Meeting click on Manage Participants.
- In the Participants menu navigate to the user who will be granted recording privileges. Click More next to their name.

- Select the option to Allow Record.

- The participant will receive the following notification:

- When a participant is recording, the participant menu will display a recording icon next to the user's name.

- To disable the participant's ability to record, click More next to the name, then click Forbid Record.

- The participant will receive the following notification:


Accessing Local Recording Files
By default, all recordings will be placed in a Zoom folder found in the following file path on these devices:
- PC: C:\Users\User Name\Documents\Zoom
- Mac: /Users/User Name/Documents/Zoom
To access recording files:
- Open the Zoom desktop client and click Meetings.
- Click the Recorded tab and select the meeting with a local recording.


Note:
- If you have a local recording that hasn't been converted to a video file yet, click Convert to convert the recording to a video file and display the options below.
- If you only see the Open option, it means the recording is a cloud recording.
- You can access these options to manage your local recordings:
- Open: Open the folder that contains the recording files.
- Play Video: Play the recorded meeting using your computer's default media player.
- Play Audio: Play the recorded meeting audio with your computer's default media player.
- Delete: Remove the meeting from the recording list on the Zoom client. This does not delete it from the computer.
- Refresh icon: Refresh the recording list if you don't see your recording.
- (Optional) Follow the steps to share a local recording if you want others to see your recording.
- Note: If there are issues opening or playing the file, check the default recording location and ensure the files are in the correct place.
Recording File Formats
Zoom recordings use the following file formats:
- MP4: Audio/Video file that is named zoom_0.mp4 by default. Each subsequent recording is in sequential order: zoom_0, zoom_1, zoom_2, etc.
- M4A: Audio-only file that is named audio_only.m4a by default. Each subsequent recording is in sequential order: audio_only_0,audio_only_1, etc.
- M3U: Playlist file to play all individual MP4 files (Windows only). Named playback.m3u by default.
- TXT: Text file that is named chat.txt by default. This file contains the in-meeting chat messages.
Note: Screen sharing recording uses about 20MB of storage per hour while video recording uses about 200MB of storage an hour. This is an approximation, since the resolution and types of video or screen sharing content could change the amount of storage used.
Changing Local Recording Settings
To change local recording settings in the Zoom client:
- Open the Zoom client and click Settings.
- Click the Recording tab.
This will open your recording options that you can change using the client.
Note: Setting the default location to a cloud syncing folder (such as Dropbox, Google Drive, or One Drive), an external drive, or network storage device may cause issues with saving and converting the local recording. Zoom strongly recommends keeping the default location on a local drive for recordings.
Recording Multiple Audio Files
When recording locally, the host can record all participants' audio streams as separate audio files, one file for each participant. To enable this option:
- Open the Zoom client and click Settings.
- Click the Recording tab.
- Enable Record a seperate audio file for each participant.

- Record and save the meeting to your computer.
- Once the meeting is over and the recording has processed, open the recording folder.
- Within the folder, open Audio Record.

- Once in the Audio Record folder, each participant's audio track will be listed as its own file in with the file name ending in the participant's name.


