Online Resource Status Check
Is your online tool running slow? Check the relevant status website for real-time updates on the tools you are relying on!
Zoom FAQ
Steps to begin using Zoom like a pro
- Submit a request for an ATSU Zoom license through the ITS Service Desk.
- Add the Zoom plug-in to your course site in Canvas.
- Launch meetings easier by added the Zoom extension to your Chrome browser.
- Learn how to automatically transcribe cloud recordings.
- How to set up your own green screen and virtual background video tutorial
- Zoom experts host free and interactive live training webinars daily. Get up to speed in less than an hour.
- Tips and Tricks for Educators Using Zoom
Basic Tutorial for how to teach online using Zoom:
- Audio Help
- Video Help
- How Do I Host A Video Meeting?
- Joining a Meeting
- How do I Start or Join a Scheduled Meeting as the Host?
- How do I invite others to join a meeting?
- Can I Host Concurrent Meetings?
- Join Multiple Meetings Simultaneously on Desktop
- Participating in Breakout Rooms
- Joining a test meeting
- Show a "Join from your browser" Link
Starting a cloud recording
Note: Only hosts and co-hosts can start a cloud recording. If you want a participant to start a recording, you can make them a co-host or use local recording. Recordings started by co-hosts will still appear in the host's recordings in the Zoom web portal.
To record a meeting to the cloud:
- Start a meeting as the host.
- Click the Record button in the Zoom toolbar.
- Select Record to the Cloud to begin recording.
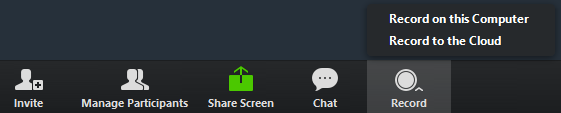
- To stop recording, click Pause/Stop Recording or End Meeting.

Once the recording has been stopped, the recording must be processed before viewing. Zoom will send an email to the host's email address when the process is completed. - Manage your cloud recordings:
- Finding and Viewing Recordings
- Automatic Recording
- Frequently asked questions about local and cloud recording
- Recording without the Host
- Managing cloud recordings
- Automatically Transcribe Cloud Recordings
- Recording Good Quality Audio to Ensure Accurate Transcripts
- Recording Notifications
- Cloud Recording Playback
- Recover a Deleted Cloud Recording
Sharing your screen
- Click the Share Screen button located in your meeting controls.

- Select the screen you want to share. You can also choose an individual application that is already open on your computer, the desktop, a whiteboard, or an iPhone/iPad.
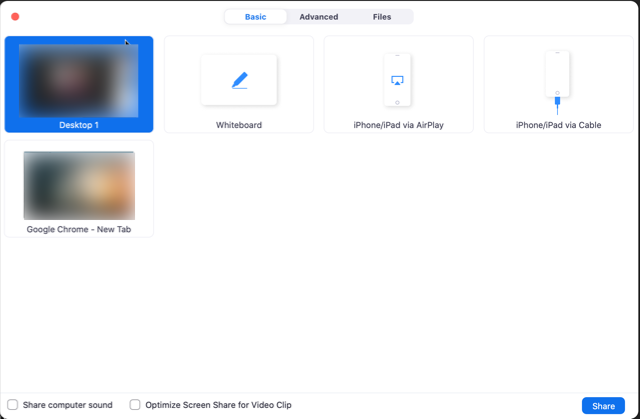
- (Optional) Enable these features:
- Check Share Computer Sound: If you check this option, any sound played by your computer will be shared in the meeting.
- Check Optimize for full screen video clip: Check this if you will be sharing a video clip in full screen mode. Do not check this otherwise, as it may cause the shared screen to be blurry.
- Click Share.
- Zoom will automatically switch to full screen to optimize the shared screen view. To exit full-screen, click Exit Full Screen in the top-right corner or press the Esc key.
- To disable automatic full screen when viewing a shared screen, disable this option in your desktop client settings: Enter full screen automatically when a participant shares screen.
- ★ Sharing your screen
- Video Layout Options While Screen Sharing
- How Do I Start A Screen Share Meeting?
- Switching Windows During Screen Sharing
- Sharing Computer Sound During Screen Sharing
- Screen Sharing a PowerPoint Presentation
- Screen Share A Keynote Presentation
- Request or Give Remote Control
- Sharing a whiteboard
- Side-by-Side Mode for Screen Sharing
- Sharing Multiple Screens Simultaneously
- Using annotation tools on a shared screen or whiteboard
- Follow Presenter’s Pointer During Screen Sharing
- Black Screen During Screen Sharing
Overview
Breakout rooms allow you to split your Zoom meeting in up to 50 separate sessions. The meeting host can choose to split the participants of the meeting into these separate sessions automatically or manually, and can switch between sessions at any time.
- Up to 50 breakout rooms can be created
- Max 200 total participants across all breakout rooms (requires Large Meeting 200 add-on)
- Breakout room participants have full audio, video and screen share capabilities
You can also share Participating in Breakout Rooms with your meeting participants for some information on using breakout rooms as a participant.
Notes:
- See Getting Started with Breakout Rooms for information on how to enable breakout rooms for your account.
- You can also pre-assign participants to breakout rooms when you schedule the meeting instead of managing them during the meeting.
This article covers:
- Creating Breakout Rooms
- Assigning Participants to Rooms
- Preparing Breakout Rooms
- Managing Breakout Rooms - In Progress
- Ask for Help
- Broadcasting a Message to Breakout Rooms
Prerequisites
- Breakout rooms enabled in your Meeting Settings
- Zoom Desktop Client
- Windows: 3.5.31087.1102 or higher
- macOS: 3.5.31087.1102 or higher
- Linux: 2.0.81497.1116 or higher
- Chrome: 2.4.943.510 or higher
Note: Users joined into the Zoom meeting from the Zoom Mobile App or H.323/SIP devices can participate in breakout rooms, but cannot manage them. Users joined via the web client, Chromebooks/Chrome OS or Zoom Rooms are unable to join Breakout Rooms, but the main room can be used as an alternative session for these users.
 Windows |
  Mac
MacCreating Breakout Rooms
Note: You can also pre-assign participants to breakout rooms when you schedule the meeting instead of managing them during the meeting.
- Start an instant or scheduled meeting.
- Click Breakout Rooms.

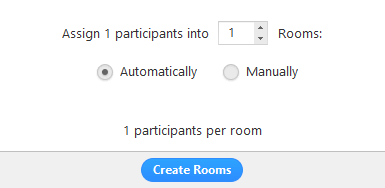
- Select the number of rooms you would like to create, and how you would like to assign your participants to those rooms:
- Automatically: Let Zoom split your participants up evenly into each of the rooms.
- Manually: Choose which participants you would like in each room.
- Click Create Breakout Rooms.
- Your rooms will be created, but will not start automatically. You can manage the rooms prior to starting them by following the instructions below.
Options for Breakout Rooms
- After creating the breakout rooms, click Options to view additional Breakout Rooms options.

- Check any options that you would like to use for your breakout rooms.
- Move all participants into breakout rooms automatically: Checking this option will move all participants into the breakout rooms automatically. If this option is unchecked, the participants will need to click Join to be added to the breakout room.
- Allow participants to return to the main session at any time: If this option is checked, the participants can move back to the main session from their meeting controls. If this is disabled, they need to wait for the host to end the breakout rooms.
- Breakout rooms close automatically after x minutes: If this option is checked, the breakout rooms will automatically end after the configured time.
- Notify me when the time is up: If this option is checked, the host will be notified when the breakout room time is up.
- Countdown after closing breakout rooms: If this option is checked, the participants will be given a countdown of how much time they have left before being returned to the main room.
- Follow the steps below to assign participants to rooms or click Open All Rooms to start the breakout rooms.
Assigning participants to rooms
To assign participants to your rooms, select Assign next to the room you wish to assign participants to and select participants you want to assign to that room. Repeat this for each room.

Once a participant has been assigned (manually or automatically), the number of participants will show in place of the Assign button.

Preparing Breakout Rooms
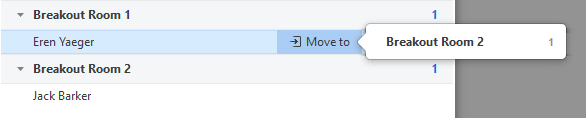
After manually or automatically assigning participants to rooms, you can rearrange the participants. Participants who are not assigned to breakout sessions will remain in the main meeting when the rooms are started.
- Move to (participant): Select a room to move the participant to.
- Exchange (participant): Select a participant in another room to swap the selected participant with.

- Delete Room: Delete the selected room.
- Recreate: Deletes existing breakout rooms and creates new ones.
- Add a Room: Add another breakout room.
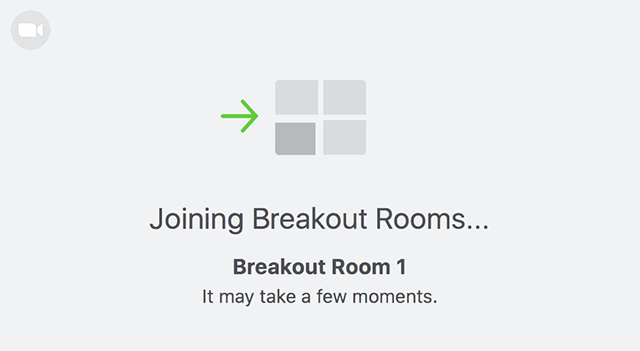
- Open All Rooms: Start the rooms. All participants will be moved to their respective rooms after confirming the prompt to join the breakout room. The host will be left in the main meeting until manually joining one of the rooms. The participants (and the host when manually joining a room) will see the following message shown when joining the breakout room.
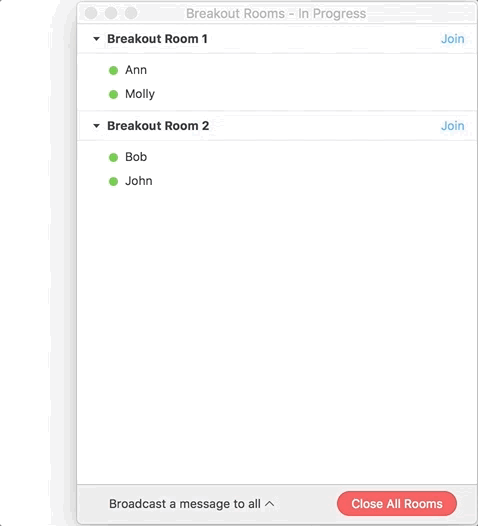
Managing Breakout Rooms in progress
Once the Breakout Rooms have been started, the participants will be asked to join the Breakout Session. The host will stay in the main meeting until joining a session manually. If a participant has not joined the session yet, it will be noted by (not joined) next to their name.
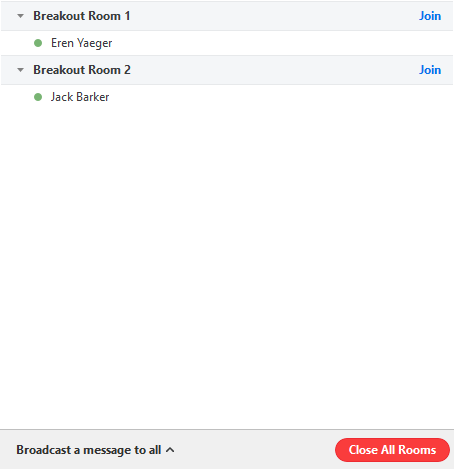
- Join: Join the breakout room.
- Leave: Leave the room and return to the main meeting (only shows when in a breakout room).
- Close All Rooms: Stops all rooms after a 60 second countdown, shown to the host and participants, and returns all participants back to the main meeting.
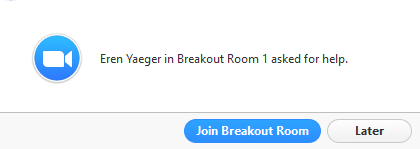
Ask for help
Participants in breakout rooms can request that the meeting host join their meeting by clicking Ask for Help.

The host will be prompted to join the room where the request originated from. Click Join Breakout Room to join the room.
Broadcasting a message to all Breakout Rooms
The host can broadcast a message to all breakout rooms to share information with all participants.
- Click Breakout Rooms in the meeting controls.
- Click Broadcast a message to all, enter your message and click Broadcast.
- The message will now appear for all participants in Breakout Rooms.

From the Zoom Support Page
Creating a Poll
- Go to the Meetings page and click on your scheduled meeting. If you do not have a scheduled meeting, schedule a meeting now.
- From the meeting management page, scroll to the bottom to find the Poll option. Click Add to begin creating the poll.

- Enter a title and your first question.
- (Optional) Check the box to make the poll anonymous, which will keep the participant's polling information anonymous in the meeting and in the reports.
- Select whether you want the question to be single choice(participants can only choose one answer) or multiple choice question(participants can choose multiple answers).
- Type in the answers to your question and click Save at the bottom.
- If you would like to add a new question, click Add a Question to create a new question for that particular poll.
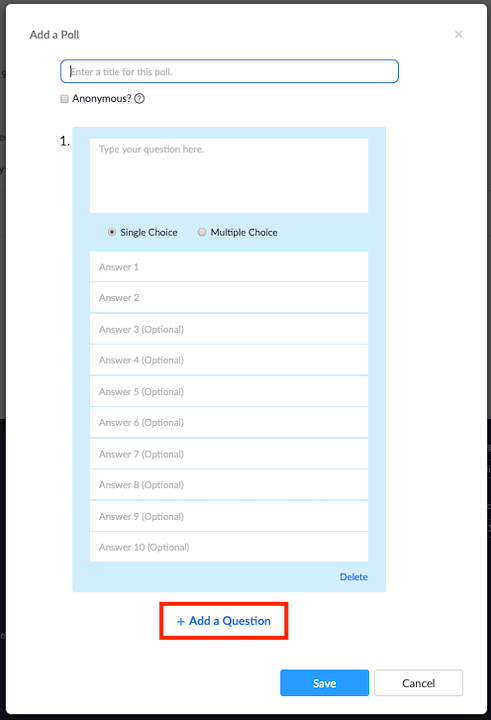
- You can add more polls by repeating Step 2.
You can also create a poll by clicking Polling during the meeting. This will open up your default web browser where you can add additional polls or questions.
Note: You can only create a max of 25 polls for a single meeting.
Launching a Poll
- Start the scheduled Zoom meeting that has polling enabled.
- Select the Polling option in the menu bar.

- Select the poll you would like to launch.
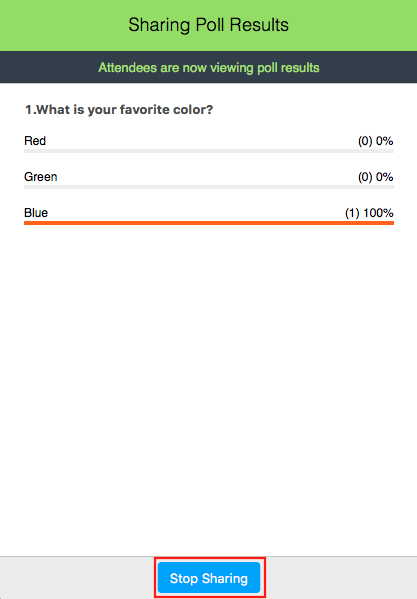
- Click Launch Poll.

- The participants in the meeting will now be prompted to answer the polling questions. The host will be able to see the results live.

- Once you would like to stop the poll, click End Poll.
- If you would like to share the results to the participants in the meeting, click Share Results.

Participants will then see the results of the polling questions.
Downloading a Report of Poll Results
You can download a report of the poll results after the meeting. If registration was turned on and the poll was not anonymous, it will list the participants' names and email addresses. If registration was not on, it will show the results, but list the users as "Guest". If the poll was anonymous, it will show "anonymous" for the participants' names and email addresses. Learn more.
From the Zoom Support Page
Canvas
ATSU Supported Canvas Help
- Check out the Recordings and Videos page for our Canvas special presentation
- Join "CATSU" (Canvas ATSU User Group)
- Enroll in Kung Fu Canvas
- Watch Lynda.com's Learning Canvas 2018
- Adding an Echo360 course link in Canvas
- Canvas Instructor Resources from CGHS
- Students having trouble using Canvas? CGHS also has a Canvas Student Resource Guide
More Canvas Training Resources
How to Migrate your Class from Blackboard
To go online using Canvas and you are wanting to move your course materials out of Blackboard, ITS has maintained a "read-only" archive for Blackboard courses. Materials can still be accessed until July 2021, but it requires a request to IT to access materials.
To make this request to access old Blackboard course materials, follow the ITS instructions provided at Blackboard is Read-Only.
Canvas Short Video Tutorials
- Announcements Overview (Instructors)
- Assignments Overview (Instructors)
- Calendar Overview (Instructors)
- Canvas Overview (Instructors)
- Chat Overview (Instructors)
- Collaborations Overview (Instructors)
- Commons Overview (Instructors)
- Conferences Overview (Instructors)
- Courses: Creation & Management (Instructors)
- Course and Student Analytics Overview (Instructors)
- Course Home Page Customization (Instructors)
- Course Settings (Instructors)
- Discussions Overview (Instructors)
- Files Overview (Instructors)
- Gradebook Overview (Instructors)
- Groups Overview (Instructors)
- Modules Overview (Instructors)
- Outcomes Overview (Instructors)
- Pages Overview (Instructors)
- People Overview (Instructors)
- Quizzes Overview (Instructors)
- Rubrics Overview (Instructors)
- SpeedGrader Overview (Instructors)
- How do I use the Announcements Index Page?
- How do I view and sort announcement replies as an instructor?
- How do I add an announcement in a course?
- How do I edit an announcement in a course?
- How do I attach a file to an announcement in a course?
- How do I delete an announcement in a course?
- How do I allow or disallow announcement replies in a course?
- How do I delay posting an announcement until a specific date in a course?
- How do I reply to an announcement as an instructor?
- How do I publish or unpublish an assignment as an instructor?
- What assignment types can I create in a course?
- What is the difference between assignment due dates and availability dates?
- How do I create an assignment?
- How do I add or edit details in an assignment?
- How do I add or edit points for an assignment?
- How do I exclude an assignment from the course's final grades?
- How do I give extra credit in a course?
- How do I move or reorder an assignment?
- How do I delete an assignment?
- How do I assign an assignment to everyone in a course?
- How do I assign an assignment to an individual student?
- How do I assign an assignment to a course section?
- How do I assign an assignment to a course group?
- How do I add a grading scheme to an assignment?
- Can a student resubmit Canvas assignments?
- How do I download all student submissions for an assignment?
- How do I upload all student submissions for an assignment?
- How do I create a peer review assignment?
- How do I manually assign peer reviews for an assignment?
- How do I automatically assign peer reviews for an assignment?
- How do I view student peer review comments as an instructor?
- How do I create a discussion as an instructor?
- How do I create a group discussion in a course?
- How do I publish or unpublish a discussion as an instructor?
- How do I edit a discussion in a course?
- How do I delay posting a discussion until a specified date in a course?
- How do I move or reorder a discussion in a course?
- How do I assign a graded discussion to everyone in a course?
- How do I assign a graded discussion to an individual student?
- How do I assign a graded discussion to a course group?
- How do I assign a graded discussion to a course section?
- How do I reply to a discussion as an instructor?
- How do I view and sort discussion replies as an instructor?
- How do I mark discussion replies as read or unread as an instructor?
- How do I change discussion settings to manually mark discussion replies as read as an instructor?
- How do I like a reply in a course discussion as an instructor?
- How do I pin a discussion in a course?
- How do I subscribe to a discussion as an instructor?
- How do I delete a discussion in a course?
- How do I use peer review discussions in a course?
- How do I create a peer review discussion?
- How do I automatically assign peer reviews for a discussion?
- How do I manually assign peer reviews for a discussion?
- How can I require students to reply to a course discussion before they see other replies?
- How do I edit or delete student discussion replies in a course?
- How do I embed an image in a discussion reply as an instructor?
- How do I attach a file to a discussion reply as an instructor?
- How do I link to a YouTube video in a discussion reply as an instructor?
- How do I allow students to create a course discussion?
- How do I allow students to like replies in a discussion?
- How do I allow students to attach files to a course discussion?
- How do I allow students to edit and delete their own discussion posts in a course?
- How do I close a discussion for comments in a course?
- How do I view my user files as an instructor?
- How do I view course files as an instructor?
- How do I view group files as an instructor?
- How do I use Files as an instructor?
- How do I move and organize my files as an instructor?
- How do I rename a file as an instructor?
- How do I create a folder in Files as an instructor?
- How do I upload a file to a course?
- How do I preview a file as an instructor?
- How do I upload ZIP files as an instructor?
- How do I bulk upload files to a course?
- How do I delete a file or folder as an instructor?
- How do I download a single file as an instructor?
- How do I download a folder in ZIP format as an instructor?
- How do I restrict files and folders to students in Canvas?
- How do I set usage rights and user access for a course file?
- How do I set usage rights and user access for a course file folder?
- How do I use the Gradebook?
- How do I view assignments or students individually in the Gradebook?
- How do I view the Unpublished Assignments column in the Gradebook?
- How do I create assignment columns for non-submission assignments in the Gradebook?
- How do I use posting policies in a course?
- How do I select a grade posting policy for a course in the Gradebook?
- How do I select a grade posting policy for an assignment in the Gradebook?
- How do I post grades for an assignment in the Gradebook?
- How do I change the status of a submission in the Gradebook?
- How do I send a message to students from the Gradebook?
- How do I download all student submissions for an assignment in the Gradebook?
- How do I upload all student submissions for an assignment in the Gradebook?
- How do I enter and edit grades in the Gradebook?
- How do I get to SpeedGrader from the Gradebook?
- How do I curve grades in the Gradebook?
- How do I set a default grade for an assignment in the Gradebook?
- How do I apply a Missing Submission policy in the Gradebook?
- How do I apply a Late Submission policy in the Gradebook?
- How do I override a student's final grade in the Gradebook?
- How do I leave comments for students in the Gradebook?
- How do I import grades in the Gradebook?
- How do I publish final grades for a moderated assignment?
- How do I view the history of all grading changes in the Gradebook?
- How do I view a student's Grades page in a course from the Gradebook?
- How do I export grades in the Gradebook?
- How do I view all groups in a course as an instructor?
- How do I add a group set in a course?
- How do I edit a group set in a course?
- How do I automatically create groups in a group set?
- How do I manually create groups in a group set?
- How do I create self sign-up groups in a group set?
- How do I allow students to create their own student groups?
- How do I automatically assign students to groups?
- How do I manually assign students to groups?
- How do I assign a student leader to a group?
- How do I message students who have not signed up for a self sign-up group?
- How do I prevent students from switching groups in self sign-up groups?
- How do I move a student into a different group?
- How do I view content and student activity within a group as an instructor?
- How do I use the Inbox as an instructor?
- How do I find my unread messages in the Inbox as an instructor?
- How do I filter conversations as an instructor?
- How do I star a conversation as an instructor?
- How do I send a message to a user in a course in the Inbox as an instructor?
- How do I send a message to a user in a group in the Inbox as an instructor?
- How do I send a message to all course users in the Inbox as an instructor?
- How do I attach a file to a message as an instructor?
- How do I attach a media comment to a message as an instructor?
- How do I reply to a message in the Inbox as an instructor?
- How do I privately respond to one individual in a group message as an instructor?
- How do I reply to submission comments in the Inbox as an instructor?
- How do I forward a message from a conversation as an instructor?
- How do I add new people to an existing conversation as an instructor?
- How do I delete a conversation as an instructor?
- How do I delete a message from a conversation as an instructor?
- How do I archive a conversation as an instructor?
- How do I publish or unpublish a module as an instructor?
- How do I add a module?
- How do I duplicate a module?
- How do I add prerequisites to a module?
- How do I add requirements to a module?
- How do I edit a module?
- How do I lock a module?
- How do I delete a module?
- How do I move or reorder a module?
- How do I add assignment types, pages, and files as module items?
- How do I add an external URL as a module item?
- How do I duplicate a module item?
- How do I edit module items?
- How do I remove module items?
- How do I move or reorder a module item?
- How do I use modules to view the progress of students in a course?
- How do I edit my profile in my user account as an instructor?
- How do I add a profile picture in my user account as an instructor?
- How do I change the settings in my user account as an instructor?
- How do I change the language preference in my user account as an instructor?
- How do I select personal pronouns in my user account as an instructor?
- How do I set a time zone in my user account as an instructor?
- How do I add contact methods to receive Canvas notifications as an instructor?
- How do I set my Canvas notification preferences as an instructor?
- How do I add an additional email address as a contact method in Canvas as an instructor?
- How do I add a text (SMS) contact method in Canvas as an instructor?
- How do I publish or unpublish a quiz as an instructor?
- What quiz types can I create in a course?
- What options can I set in a quiz?
- How do I create a quiz with individual questions?
- How do I create a quiz with a question group to randomize quiz questions?
- How do I create a quiz by finding questions in a question bank?
- How do I create a quiz with a question group linked to a question bank?
- How do I create a Multiple Choice quiz question?
- How do I create a True/False quiz question?
- How do I create a Fill-in-the-Blank quiz question?
- How do I create a Fill-in-Multiple-Blanks quiz question?
- How do I create a Multiple Answers quiz question?
- How do I create a Multiple Dropdown quiz question?
- How do I create Likert scale quiz questions?
- How do I create a Matching quiz question?
- How do I create a Numerical Answer quiz question?
- How do I create a Formula quiz question with a single variable?
- How do I create a Simple Formula quiz question?
- How do I create an Essay quiz question?
- How do I create a File Upload quiz question?
- How do I create a Text (no question) quiz question?
- How do I link course content to a quiz question?
- How can I create a quiz where students only see one question at a time?
- How do I make a quiz available before or after the due date?
- How do I assign a quiz to an individual student?
- How do I assign a quiz to a course section?
- How do I delete a quiz?
- How do I export quiz content from a course?
- Once I publish a quiz, how do I make additional changes?
- Once I publish a quiz, how do I use the Moderate Quiz page?
- Once I publish a quiz, what kinds of quiz statistics are available?
- Once I publish a quiz, how can I give my students extra attempts?
- Once I publish a timed quiz, how can I give my students extra time?
- How do I manually submit outstanding student quiz submissions?
- How do I view student results in a quiz?
- How do I view a quiz log for a student?
- What options can I use to regrade a quiz in a course?
- How do I regrade a Multiple Choice quiz question?
- How do I regrade a True/False quiz question?
- How do I regrade a Multiple Answers quiz question?
- How do I create a survey in my course?
- How do I view survey results in a course?
- How do I view practice quiz results in a course?
-
Screencast: Feel Secure about Your Relationship with Quizzes
-
Webinar 3/12/20 - Best Practices for Creating Online Quizzes
-
Webinar Slides
-
ATSU Supported Tools for Teaching Online
Assessment
- ATSU does have Lockdown Browser and Respondus Monitor.
- LockDown Browser: overview of key features, and instructor resources
- Respondus Monitor: overview of key features, and instructor resources
- Respondus Monitor normally costs around $15 per student per year, but they recently announced that it is free for the rest of this semester.
-
Rapid Rollout for Instructors answers the top questions instructors have about LockDown Browser & Respondus Monitor
Lecture Recording
- Echo360
- Microsoft Powerpoint
Supplemental Resources : Health Sciences Content
- Temporary VitalSource Helps Access
- VitalSource includes many required textbooks not available elsewhere as ebooks. Registration is required to borrow books. Students and Instructors are able to borrow up to 7 books total.
- Access ends on May 25th, 2020
- All Self-Study Anatomy Resources & Databases available through the ATSU Library
- Image Resource Guide from the ATSU Library
Time Management when Teaching Online
Tips and Strategies
- Time Management Strategies from Johns Hopkins
- Time Management Strategies for Online Instructors from the University of Wisconsin
- Time Management Strategies for Teaching Online
- The 10 Key Rules for Managing Time in Online Teaching
- I've Been Teaching Online for Years. Here's How to Prevent Burnout During a School Closure
- 5 Time Management Tips For Managing An Online Classroom
Tools
- Trello
- A collaboration that organizes your projects into boards. In one glance it allows you to see what is being worked on, what needs to be worked on, and what is already completed. Set due dates, add a checklist, and upload screenshots.
- Todoist
- task management software that can be used for small teams, individuals and professionals to manage anything from a shopping list to major projects at work
- Remember the Milk
- It allows users to manage tasks from a computer or smartphone, both online and offline. Has a search feature and allows for document attachment.
Courses
Teaching Online Guides
- Google for Education Resources tips for enabling distance learning through G Suite and Chrome
- Faculty-Facing Checklist & Lesson Planning Template for Teaching a Live, Online Session
- Going Online in a Hurry: What to Do and Where to Start
- Western Washington University Checklist for making the transition
- ACUE's Online Teaching Toolkit. To support instructors needing to make a quick transition to utilizing an online environment.
- Resources to Effectively Transition to Remote Work and Learning
- Best Resources For Creating Live Virtual Training Right Now
- ATSU Public Statement of Library Copyright Specialists: Fair Use & Emergency Remote Teaching & Research
More Tools for Teaching Online
Assessment
- Adobe Connect
- Virtual Classroom tool
- Free for 90 days
- Examsoft
- Proctorio
- FeedbackFruits Pedigogical Tools
- Exam.net
- Kaizena
- Review up to 75% faster than typing with Voice Comments. Embed explainer videos in three clicks
- Turning Point
Interactivity in the Virtual Classroom
- Jamboard
- Poll Everywhere
- Zoom Polling for Meetings
- Mentimeter (2 weeks for free)
- Kahoot
- UMU
Group Work
Teaching Online and Going Remote
- Magna's Taking Your Teaching Online Program Collection
- Enter coupon code COLLECTION in the cart prior to checkout to receive this collection for free!
- Coursera Courses
- Microsoft Teams
- Chat, meetings, calling, collaboration
- Free through 2021
- Slack Messaging Service
- Not currently supported at ATSU but if you use this communication/collaboration tool here are some resources:
- Free for small groups
- Organize conversations by topic, project, team; share files
More Tools for Lecture Recording
- Techsmith
- Loom
- With Loom, you can capture your screen, voice, and face and instantly share your video
- Snip & Sketch/Snipping Tool
- Capture a screen shot, or snip, of any object on your screen, and then annotate, save, or share the image
- Apps available on PC through Microsoft (should already be downloaded on your computer)
Supplemental Resources : Health Sciences Content
- Clinical Teaching and Learning Experiences without Physical Patient Contact - Association of American Medical Colleges
-
This resource collection was built in response to the COVID-19 pandemic’s significant impact on the teaching and learning of health professionals. Designed by diverse educators, this working collection features clinical learning experiences, which can be readily used or easily adapted for specific, local settings, without the need for physical patient contact.
-
Includes resources for Interpersonal and Communication Skills, Medical Knowledge, Patient Care, Practice Based Learning and Improvement, Professionalism, and Systems Based Practice.
-
- Lecturio
- Study medicine from anywhere with video lectures by teaching award-winning professors integrated in a powerful Qbank.
- Sign up for a free account. Access to 20 hours of video lectures and 1000 quiz questions, along with access to the Lecturio Bookmatcher.
- Free Lectures:
- (Article) COVID-19 (Coronavirus disease 2019)
- (Video) COVID-19 Etiology, Epidemiology, Diagnosis
- (Video) COVID-19 Overview and Management
- Study medicine from anywhere with video lectures by teaching award-winning professors integrated in a powerful Qbank.
- Osmosis
- Osmosis empowers with a better understanding of medicine and health topics. Learn more and forget less with fun, easy-to-digest videos and tools that help you study more strategically, at your own pace.
- Free 1 week trial
- Resource library with certain free tools
- Osmosis empowers with a better understanding of medicine and health topics. Learn more and forget less with fun, easy-to-digest videos and tools that help you study more strategically, at your own pace.
- Online Medex Making Case X free for your M3 Students
- Case X gets you as close as possible to real repetitions on real people. Real patients, real questions; immersive and interactive videos.
- Access to 70+ hours of comprehensive video covering 250+ topics across 19 specialties.
- Access to study schedules & resources
- Free to students.
- Case X gets you as close as possible to real repetitions on real people. Real patients, real questions; immersive and interactive videos.
- Oxford Medical Simulation for lab-based or clinical classes
- Clinical Simulation Scenarios
- From NHS Health Education England - Thames Valley
- 137 detailed scenarios
- From NHS Health Education England - Thames Valley
- MedSims
- Sign up for a free account to access online medical simulations that provide real-world scenarios and patient interactions
- Aquifer Clinical Learning
-
Free access to 146 Aquifer signature cases, WISE-MD (Surgery), and WISE-OnCall (Readiness for Practice) through June 30, 2020, to all current Aquifer institutional subscribers.
-
Other signature cases include Pediatrics, Family medicine., Internal medicine, Geriatrics and Radiology, WISE-MD (surgery) and WISE-OnCall (transition to residency)
-
Additional Resources
- Remote Teaching Resources from universities and colleges across the U.S.
- The Wright Center
- Colleges and universities closed for COVID-19
- COVID-19 Resources & Offers
- Virtual Classroom Resources
- Educational Resources spreadsheet